Our NetSuite tips are designed to help you get the most out of using NetSuite. This month’s guide is all about defining and scheduling mass updates.Provided you have permission, you can use NetSuite’s Mass Updates functionality to find multiple records with outdated information and update all field values of these records simultaneously, rather than having to update them one by one.
Here’s how:
Defining a mass update
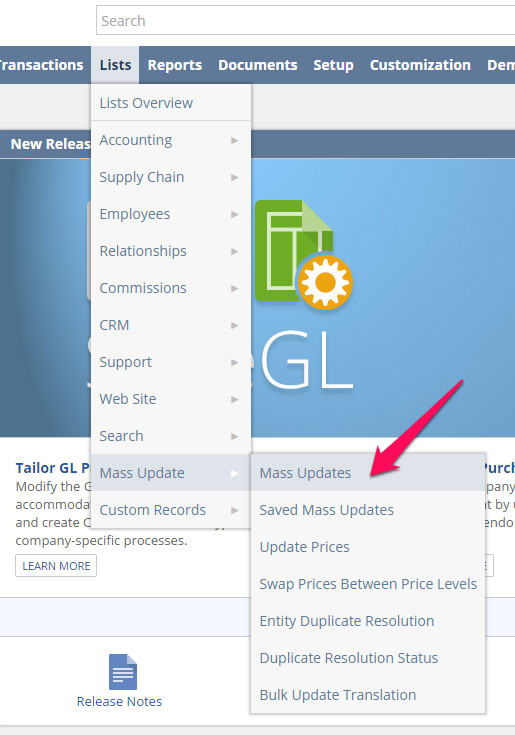
1. Go to Lists > Mass Update > Mass Updates:
2. On the Mass Updates list, expand a category and click a link

3. In the Title of Action field, enter a name for this update (if you are saving this mass update, create a name that describes the update so you can find it easily in the future)
4. To enter the new information:
If you are performing a General mass update on a record type:
- Click the Mass Update Fields subtab and review the fields that are available for update
- Tick the box in the ‘Apply’ column next to each field you need to update, and enter or select the new data in the ‘Value’ column
- Alternatively you can enter a formula to dynamically calculate values to be entered. See ‘Entering Formulas for a Mass Update’ in the NetSuite help centre
If you are performing a specific type of update, such as Contact Management:
- To the right of the Title of Action field, select or enter the new data

5. Define a filter or filters on the Criteria subtab:
- Select a field or formula in the dropdown and enter values in the popup that appears
- For further information, see ‘Defining Advanced Search Filters’ in the help centre
6. On the Results subtab, define the display options for your mass update results:
- Select the order in which you want the results to sort
- Choose to view the list as a report, grid or graph
- Pick which columns you want to appear in the list
- For further help, search ’Defining Search Results Display Options’ in the help centre
7. Define the users who can run the update on the Audience subtab, if available
8. If you are an administrator and you want to run the mass update on a recurring basis, set up this recurrence on the Schedule subtab. (See section below for further help on this)

9. Click Preview to see which records the mass update will change
- To modify the mass update, click Return to Criteria, and repeat steps 4-9 as necessary
- If your list has less than 1000 entries, an ‘Apply’ column is shown. If any record listed should not be updated, clear the box in the Apply column
10. Choose one of the following options:
- Click Perform Update to make the mass update. Please note: Once you click Perform Update, you cannot stop or cancel it, so proceed with caution!
- Click Save to save this mass update for future use. Note: When you save the update, it is not run. When you save a mass update, you can always return to the list to make changes to the same records by going to Lists > Mass Update > Saved Mass Updates. Click Preview next to the name of the update, and then click Perform Update to make changes.
You can update more than one field on records by using the links under the General Updates heading on the Mass Updates list. Use the links under the other headings (Sales Force Automation, Contact Management, Activities, etc) to quickly create more specific updates that only affect one field.
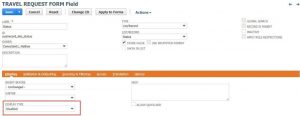
To be available for mass update, a field must meet the following criteria:
- It must support inline editing
- It must be displayed on your preferred form for the record type being updated. For example, if your preferred invoice form does not include the To Be Printed field, this field is not listed on the Mass Update Fields subtab for a mass update to invoices
- If it is a standard field, it must be outside of subtab lists and must not have dependencies on other fields
- If it is a custom field, it must be stored and must not have a sourcing relationship
Points to note:
- When you run a mass update, processing 50 records or less begins instantly. If you are processing more than 50 records, there may be a delay of up to one minute before the job begins
- Once a mass update is in process, you can’t stop it or cancel it
- After you have saved a mass update, it is available here: Lists > Mass Update > Saved Mass Updates
- Be aware that only one mass update can be run at a time in your account
- Additional mass update options may be available at Lists > Mass Update, depending upon the features enabled in your account
- If the mass update you want is not available, you can try using NetSuite’s Import Assistant to update data through import of a CSV file. See ‘Importing CSV Files with the Import Assistant’ in the NetSuite help centre
Mass updates and SuiteScripts
Mass Update Scripts
You can perform custom mass updates to update fields that are not available through general mass updates using a SuiteScript action script. Search ‘Mass Update Scripts’ in the help centre for assistance with this.
If the SuiteFlow feature is enabled, you also can use NetSuite’s mass updates functionality to find multiple record instances associated with a single workflow, and either initiate or process all records simultaneously. Search ‘Workflow Mass Updates’ in the help centre for this.
Search ‘Workflow Mass Updates’ in the help centre for more information..
Mass Updates and User Event Scripts
Be aware that a record change that results from a mass update can trigger a related user event script just as the same change not made through a mass update would.
However, in the case of the mass update, the full record is not passed to the user event script. Only the field(s) actually changed by the mass update is passed instead. For details about user event scripts, search ‘User Event Scripts’ in the help centre.
Scheduling a Mass Update
If you have the Schedule Mass Updates permission, you can set up a mass update to run on a recurring basis, according to a schedule that you specify.
Be aware that only one mass update can run at a time in your account. While a scheduled mass update is running, you cannot start another mass update.
Please note:
If you have Create, Edit, or Full level of the Schedule Mass Updates permission, a Schedule subtab displays on each mass update page, where you can define a new scheduled mass update.
If you have Edit or Full level, you can edit an existing scheduled mass update and save it with the same name. However, if you have Create level, and you edit an existing scheduled mass update, you cannot save it with the same name; you need to save as a different name.
To set up a schedule for a mass update:
1. On a mass update page, click the Schedule subtab

2. Enable the Run Update According to Schedule option
3. Select the interval at which you would like to run the mass update, or click Single Event to run the mass update just once
4. As you select each interval, additional options are displayed for you to select. For example, if you select Weekly Event, you then can select individual days of the week on which to run the update
5. Select a series start date. This is the first day on which the mass update is run
6. Select an end date in the End By field or check the No End Date box to continue running the mass update indefinitely
7. Define other characteristics of the mass update and save it
You must save a mass update for its schedule to take effect. Once you have saved a scheduled mass update, it is listed at Lists > Mass Update > Saved Mass Updates, with its recurrence displayed in the Schedule column.
After you save a scheduled mass update, you can review information about the times it was run in history columns on the mass update page’s Schedule subtab. These columns include the date, user, and count of records updated for each time the mass update was run.
Example Mass Update
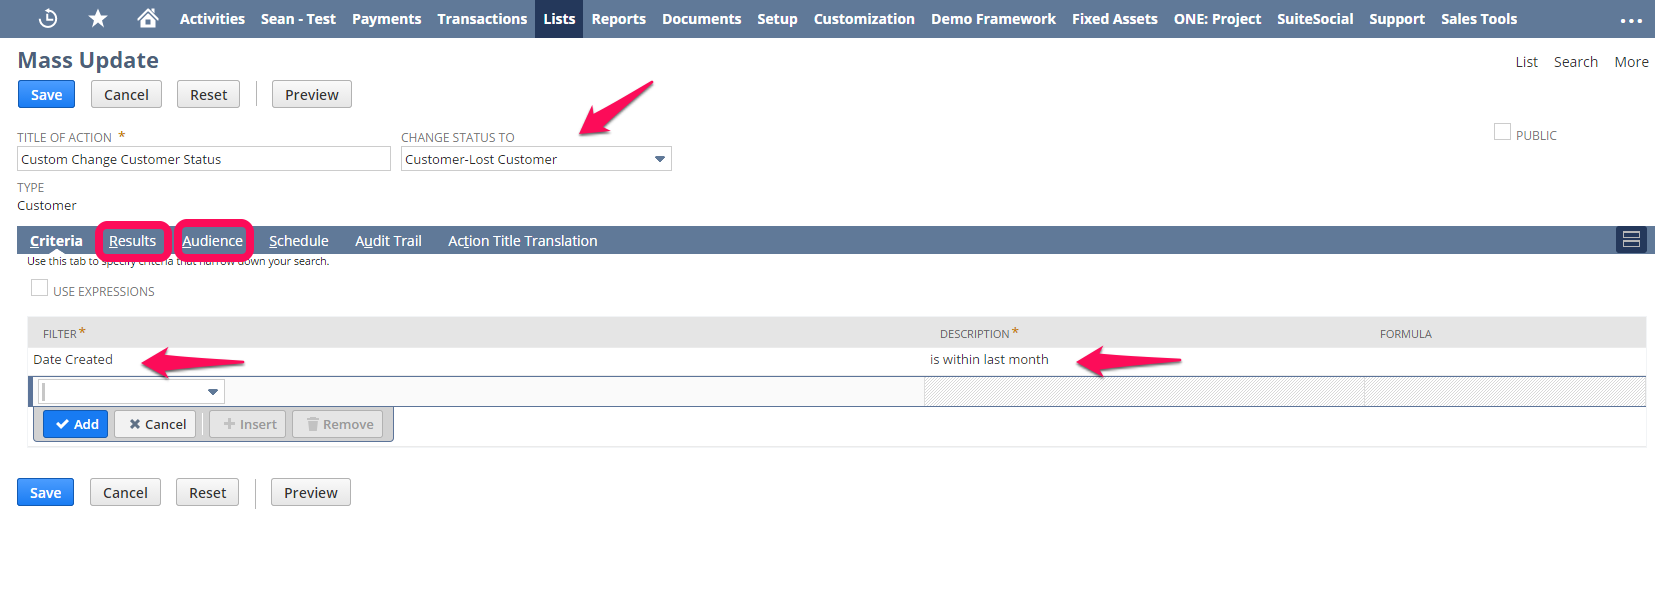
A sales manager can give all outdated lead records the status Customer-Lost Customer:
1. From the Contact Management section of the Mass Updates list, the manager selects the Change Customer Status mass update. On the Mass Update page, the manager:
- In the Change Status to dropdown, selects Customer-Lost Customer
- On the Criteria subtab, defines the Date Created as a filter, and in the popup that appears, selects within last month to date and clicks Set
- On the Results subtab, defines the columns to be displayed as update results
- On the Audience subtab, defines the users who have access to the mass update
- Clicks the Save button
2. The mass update is now available as a saved mass update
3. The manager can go to Lists > Mass Update > Saved Mass Updates each month and use the saved mass update to close lead records that have become outdated since the last update
Defining and scheduling mass updates is a time-saving way to update a large amount of records. If you would like to find out more about how NetSuite works, please don’t hesitate to get in touch with our team of experts or view our other guides.
Feel free to share this guide with your colleagues or comment below.