Our NetSuite tips are designed to help you get the most out of using NetSuite. This month’s guide is all about publishing your dashboards and rolling them out across your team. This ensures everyone is seeing the same data on a consistent interface.
We’ve previously covered how to personalise your dashboards, but did you know that administrators can share their personalised dashboards with other users who log into the same centre?
Why publish your dashboards?
Published dashboards make sure a whole team will see the same interface. This consistency makes collaboration easier, as they will always have ready access to the same data.
Publishing dashboards can also save time as it allows a single administrator to set up dashboards for an entire team of users so multiple people don’t have to duplicate the task
Getting started: A few things you need to know
- In order to publish dashboards, you must have the ‘Publish Dashboards’ permission. This is usually assigned to administrators by default, but most users won’t have access to it.
- You can only publish a dashboard to roles that tie to the same centre in which you have personalised the dashboard. For example, if your role is set to sales administrator, you can publish a personalised dashboard only to roles tied to the sales centre.
- When you publish a dashboard, you make the following choices. Note that some choices can be changed after you have published the dashboard, and others cannot:
- The roles to which the dashboard should be published. (Can be changed later.)
- Whether the dashboard should be published to new users only; or to both existing and new users, replacing existing users’ dashboards. (Can be changed later.)
- The tabbed pages to include in the dashboard. (Cannot be changed later.)
- The restriction levels for users’ dashboard personalisations. (Cannot be changed later.)
- All of a published dashboard’s information may not be available to all of its users. Users can view only the dashboard content that their assigned roles give them permission to see.
- After you have published a dashboard, you can make further changes to it and apply these changes to users’ dashboards. It is not possible revert back to dashboard settings that were previously published.
How to assign published dashboards to users
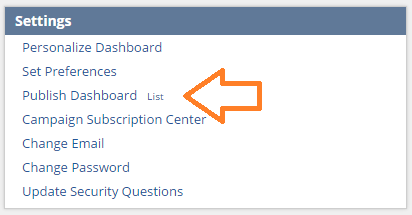
1. Go to your home page, and in the Settings portlet, click ‘List’ next to Publish Dashboard
2. A list of your dashboards appears
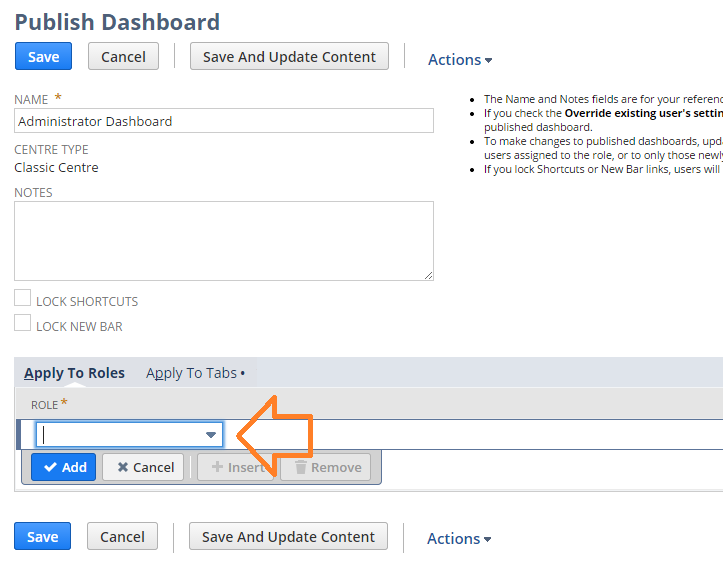
3. Click Edit next to the name of the dashboard for which you want to change assigned users

4. On the Apply To Roles subtab of the Publish Dashboard page, you can:
- Add a role to which the dashboard should be published by placing the cursor in a blank line, selecting a role from the Role list, and clicking Add.
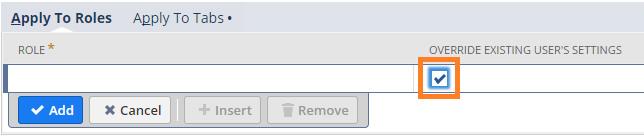
- By default, for a previously published dashboard ‘Override Existing User’s Settings’ is set to No, indicating that the dashboard will only be published to new users assigned the selected role. Tick this box to change it to Yes if you want to publish the dashboard to existing users with the selected role, replacing their current dashboards.
- Remove a previously selected role from the published dashboard’s list by selecting the role and clicking the Remove button.
5. Click Save.* The published dashboard is applied to users with the selected roles. They will need to log out and log back into the system for changes to be visible.
* NOTE: If you want to restrict users’ dashboard personalisations, don’t click Save just yet – see next section first.
Restricting users’ dashboard personalisations
When you first publish a dashboard, you can set a restriction level that indicates the types of changes users can make to each tabbed page of the published dashboard.
You set this restriction level by selecting from the following three modes on the Publish Dashboard page’s Apply To Tabs subtab:
- Unlocked – lets users make all changes to the selected page
- Locked – restricts users from making any changes to the selected page
- Add/Move Content – allows users to add and rearrange portlets on the selected page, while preventing them from removing portlets.
You select a mode for each tabbed page, or tab, included in the published dashboard. You can select different modes for each tab.
After you have saved a published dashboard, you cannot modify these modes, so make your selections very carefully
Making changes to published dashboards
When you make changes to a personalised dashboard that you have published, you can apply these changes to the dashboards of all or some of the users, based on their assigned roles. Here’s how:
- Log in with the role you were using when you published the dashboard
- Make changes to one or more tabbed pages included in the published dashboard and Save
- Go to your home page, and in the Settings portlet, click ‘List’ next to Publish Dashboard
- Click Edit next to the dashboard you have just changed
- On the Apply To Roles subtab, you can apply your changed dashboard to users’ dashboards based on their roles
- For each role to which you want to apply the changed dashboard, tick the box in the ‘Override Existing User’s Settings’ column
- If you ticked this box for a role when you initially published the dashboard, this box won’t be ticked now. If you want to apply these changes to that role, you must tick this box again
- Click the ‘Save and Update Content’ button.
Note: If you click the Save button, the dashboard definition is saved but the changes are not applied to users’ dashboards.
Users will need to log out and log back into the system for changes to be visible. In some cases, they may need to manually refresh each page for which a dashboard has been edited (this may be due to their browser’s caching settings).
Like this article? Click here to tweet it!
If you would like to find out more about how NetSuite works, please don’t hesitate to get in touch with our team of experts or view our other guides below.
Feel free to share this guide with your colleagues or comment below.