Continuing our series of guides for our NetSuite customers – this month we’re looking at sending emails from NetSuite. Our guides are designed to provide hints and tips to make our customers’ lives easier with regards to the use of NetSuite – here we cover customising email signatures and sending emails directly from records.
You can send emails to your clients and customers directly from the NetSuite application, which means that all of your correspondence with your contacts (customers, leads, vendors, partners, etc..) is attached to their specific records.
Customising email signatures and from fields
You can set up an email profile to customise the following:
- The name that appears in the From field
- The From email address
- A custom signature
To set up your email profile:
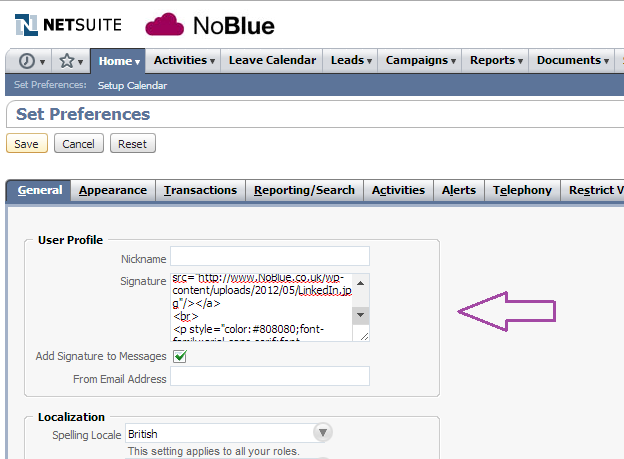
- Go to Home > Set Preferences, in the User Profile area of the General subtab:

- In the “Nickname” field, enter the name you want to appear in the “From” field on the emails you send.
- In the Signature field, paste an existing HTML email signature, or plain text if your prefer..
- Tick the “Add signature to Messages” box
- In the “From Email Address” field, enter the email address you want to appear in the From field on the emails you send.
- Click Save.
Note: If you do not enter a nickname or a from address, the email address you log in to NetSuite with appears in the From field.
Sending emails from records
Email messages you send from NetSuite records are saved on the “Messages” subtab for each contact receiving the message as well as on the record you send the email from.
You can choose to email a contact from the following types of records:
- Contact
- Customer
- Lead
- Prospect
- Vendor
- Company
- Other Name
- Partner
- Opportunity
- Transactions
To send emails from a record:
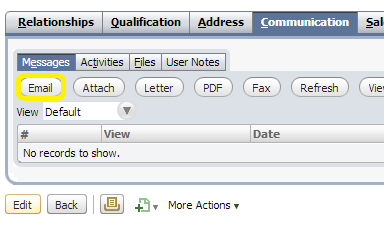
1. On the record you want to send an email message from, click the “Communication” tab. (If you can’t see this tab, speak to your administrator)
2. On the “Messages” subtab, do one of the following:
- If you are replying to or forwarding an email message, click “View” next to the email message, and then click Reply, Reply to All, or Forward.
Notes:
If you are replying, attachments are not included by default. These must be added on the Attachments subtab. Forwarded messages include attachments by default.
You cannot forward messages on employee records or on contact records that are not associated with a company.
- If you are sending a new email message, simply click “Email”.
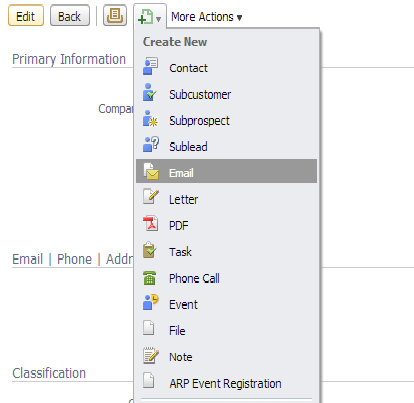
Alternatively, for sending new emails you can click the “create new” button at the top of the screen and select “email” from the drop down:
3. A new email message box will pop up:
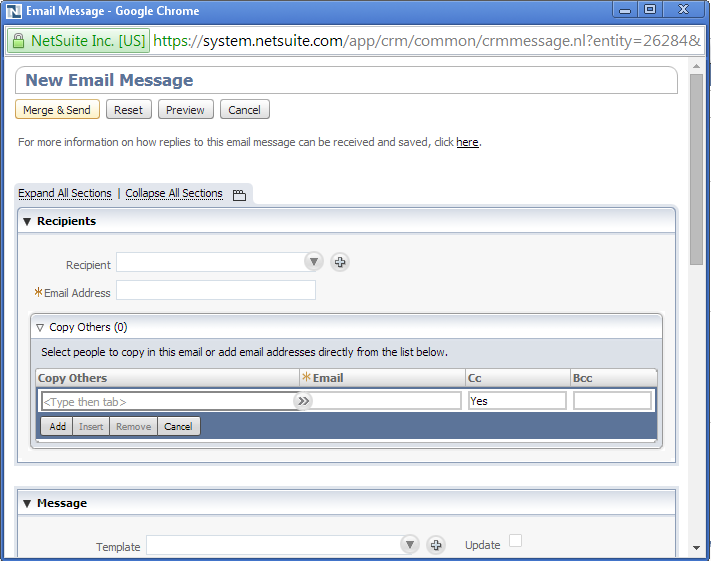
4. In the “Recipients” box…
- Select the contact you want to email in the Recipient field, or enter an email address.
- In the “Copy Others” column, select others you want to include in this message.
- In the “Email field”, enter an email address if one does not exist. You can add emails ‘ad hoc’ here if you wish.
- Tick the “Cc” box to copy this contact, or tick the “Bcc” box to blind copy the contact.
- Click “Add” for each contact you wish to insert.
5. In the “Message” box..
- To use an email template in this message, select a template you have uploaded to NetSuite.
- Tick the “Update” box if you wish to update your template with any edits you make in the message field (provided you have the permissions to do so).
- Enter a subject for your message if you aren’t using a template.
- Tick the “Request Read Receipt” box to request read receipts from individual recipients.
- In the Message field, enter your email message. If you selected a template file, you can edit the message in this field.
6. In the “Attachments” box…
- Tick the “Zip Attachments” box to compress any large files you are sending.
- In the “Attach Document Template” field, select a letter template to format your attachment.
- If you’re in an entity record, (e.g. lead, prospect, customer) and you wish to attach a statement to this message, tick the “Include Statement” box, and select the date of the statement.
- In the “Attach File” column, select the file from your file cabinet you want to attach to this message by clicking “List”. Or select “New” to upload a new file from your computer.
- Click “Add” after each attachment you want to add.
Note: Email attachments must be 5MB or smaller.
7. Click “Send”, or if you use the Mail Merge feature, click “Merge & Send”.
Note: If you use the UK Edition of NetSuite, in order to comply with UK law, your business address and VAT number are included in the footer of all email you send to those outside of your company.
Replies:
If contacts for your customers, vendors or partners reply to the email you have sent from NetSuite, that reply is both sent to the email address you log in with and automatically saved to the “Messages” subtab of the contact record and customer, vendor or partner’s record.

TOP TIP: If you forget to send your email through NetSuite – and you use your personal email account instead – then don’t worry, you can add it to the relevant NetSuite record afterwards. All you have to do is:
- Navigate to the record that you would like to attach the email to.
- Under the “Communication” tab, select “Attach”.
- A new box will pop up. Select via the dropdowns who the email was from and which record you want to attach the message to.
- Select the date and time you sent the message.
- Copy and paste your subject line and message.
- Tick the “emailed” box.
- Add any attachments.
- Click “save”. This will add your message to the record without re-sending it.
We’re a 5* certified NetSuite partner. If you would like to find out more about how NetSuite works, please don’t hesitate to get in touch with our team of experts.
Feel free to share this guide with your colleagues or comment below.
- January – “NetSuite tips – Making search easier”
- February – “NetSuite tips – Navigating through the application”
- March – “NetSuite tips – Understanding the dashboards”
- April – “NetSuite tips – creating custom KPIs“
- May – “NetSuite tips – creating and editing KPI scorecards”
- June – “NetSuite tips – how to set up email alerts“
- August – “NetSuite tips – setting up reminders“
- November – “NetSuite tips: An overview of the changes to NetSuite’s user interface“